Note: I'll be using the first post as a blog and compendium of all the info I come across.
I bought a slightly damaged (physically, but not operationally) and not-so-clean i5-3320 X230 off EBay on the cheap (less than 50 USD, shipping included). However, the not-so-clean actually turned out to be somewhat of a misnomer. I decided to clean up the keyboard by taking all the keys off to dust it, as suggested by this YouTube video, but discovered that the area under the keyboard was filthy (a understatement actually), and that previous heavy user of the keyboard was either a very hairy old guy or albino, or had a white cat or Angora rabbit, or all of the above (insane amounts of fine white hair and food crumbs under the keyboard):
I cleaned up everything with a brush as well as I could, but it's still far from clean:
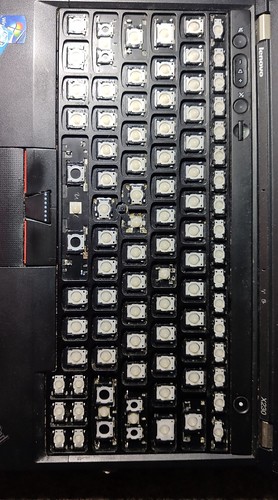
I've seen suggestions and videos of using Isopropyl acohol to clean out keyboards, but I don't have easy access to it. I've seen a howto thread here which suggests a mild soap bath, with comments as to why that's a horrible idea. All said and done, what are my options for cleaning the keyboard up? I'm not gonna be replacing the keyboard, as that negates the whole on the cheap aspect of the laptop.
ToDo:
- Figure out way to patch the broken corners of the lower chassis.
- Fix the break at the top left corner of the lid at the joint between the 2 sections (another common damage point).
Take a look at our
ThinkPads.com HOME PAGE
For those who might want to contribute to the blog, start here: Editors Alley Topic
Then contact Bill with a Private Message
ThinkPads.com HOME PAGE
For those who might want to contribute to the blog, start here: Editors Alley Topic
Then contact Bill with a Private Message
[X230]Keyboard Cleanup and Chassis/Lid Repairs
-
- Senior ThinkPadder
- Posts: 3858
- Joined: Mon May 28, 2012 5:49 am
- Location: Metro Manila, Philippines
Re: [X230]Keyboard Cleanup and Chassis/Lid Repairs
If it's just dust and hair, just use a small brush, needlepoint tweezers, air blower, vacuum. Remove the keyboard from the laptop, turn it upside down and shake it a bit. The last thing you want inside a laptop keyboard is liquid of any sort.
Planned Purchase: T480s i5-8350 FHD Touch
Impulse Buy: Thinkpad not named for safety reasons
RIP: X220 4291-C91 X61 7676-A24 760XD-U9E
Impulse Buy: Thinkpad not named for safety reasons
RIP: X220 4291-C91 X61 7676-A24 760XD-U9E
-
- Junior Member
- Posts: 273
- Joined: Thu May 09, 2019 6:46 pm
- Location: Europe
Re: [X230]Keyboard Cleanup and Chassis/Lid Repairs
Oh my Dear! That keyboard does look filthy. I can't imagine what the previous owner have been doing with that. Nasty stuff...
I have a spare keyboard which I can give you for free, I can add it to that dead battery parcel if you're interested.
T470
Re: [X230]Keyboard Cleanup and Chassis/Lid Repairs
Before I start, let me describe the lid, to explain my labeling:
The clamshell lid is made up of a large metal rectangle on top of which a narrow plastic rectangle is attached. The plastic rectangle contains all the antennae, which would work much worse if the complete lid was metal. The plastic is attached to and supported by a pair of "Bunny Ears" on the top corners of the metal rectangle. The break point on the lid is almost universally at the base of the bunny ear where the lid rests against the expresscard slot (where there is has a LOT of flex, leading to breaks in lids, palmrests, and keyboard supports - why didn't Lenovo sell the x2[23]0 with ExpressCard blanks - would've saved insane amounts of broken palmrests, keyboard supports and clamshell lids).
I managed to repair the lid break (replicated on my primary x230 and x220) with the following method:
Following the instuctions of the x220/x220i Hardware Maintenance Manual:
- Unscrew, then unclip, then remove the screen bezel and place it aside.
- Unscrew the screen and place it on the keyboard (no disconnection required if you're careful)
- Flatten the empty clamshell lid as level as possible using books as shims under the clamshell base.
- Take a narrow but long screw (like the T420 keyboard screw), and remove it's head, so that you have 15 mm long spiral patterned metal cylinder (smooth won't hold as good)
- Move the Antenna cables out of their slot at the edge of joint where the plastic rectange is attached to the metal rectangle.
- Glue the screw in the slot along the outer edge using a 2 part epoxy (my father's sworn by Araldite the last 40 years, which is what I used here).
- Use a rope around the 2 rectangles to force them together
- Clamp the edges straight with a pair of wood strips between the teeth of a strong clamp to protect against bending of the joint by the force of the rope.
- Repeat on the non-broken side, shouldn't need rope or clamps there, as this is preventive. - Do this NOW if it ISN'T broken to protect against bad design decisions.
I haven't yet figured out the chassis repair, and probably won't as that x230 requires a heat-sink re-paste before anything else, which I haven't the confidence for, yet.
PS. The keyboard that Jake donated to me is the one that kept that x230 working for my kid for 2 years before the heatsink debacle.
-
- Similar Topics
- Replies
- Views
- Last post
-
-
IBM PS/Note 425 (ThinkPad 350) successful hinge fix & other repairs
by astral » Sun May 12, 2024 1:00 am » in ThinkPad Legacy Hardware - 6 Replies
- 158 Views
-
Last post by astral
Sun May 12, 2024 5:57 pm
-
-
-
X230 trackpoint, mouse buttons and some keys still not working after keyboard change
by frog4 » Mon Jan 22, 2024 4:24 pm » in ThinkPad X230-X280 / X390 Series - 2 Replies
- 1772 Views
-
Last post by frog4
Tue Jan 23, 2024 5:22 am
-
-
-
FREE: Used X230 Keyboard and Palmrest
by JPOESQ » Wed May 08, 2024 8:24 am » in Marketplace - Forum Members only - 0 Replies
- 92 Views
-
Last post by JPOESQ
Wed May 08, 2024 8:24 am
-
-
- 1 Replies
- 2192 Views
-
Last post by TPFanatic
Tue Nov 21, 2023 9:31 am
Who is online
Users browsing this forum: No registered users and 21 guests