Since this whole thing seems to be in a state now where you can call it stable, I will try to explain the essential contents from
this thread here in english.
FSB 1066 CPUs including Core 2 Quad on T61 mainboard:
1) Flash RAM SPD and modified BIOS:
a) Use DDR2-800 RAM, because after the FSB change, the RAM will run at 440 MHz (DDR2-880). Maybe you will need to edit the SPD of your RAM, so that it uses the timings for the DDR2-800-profile also in the DDR2-667-profile (which is the one that is used by the BIOS) so that it works stable at 440 MHz.
Edit (more detailed):
After the hardware modification to enable the possibility of using FSB 1066, the RAM will work at nonstandard 440 MHz instead of 333 MHz (if a FSB 1066 CPU is used - otherwise, it will still work with the normal speeds of 333 MHz (assuming DDR2 667 or DDR2 800 sticks installed). Without editing of the RAM SPD, most RAMs will not run stable with the higher frequency. Also, if the RAMs are DDR2-800, the BIOS will still use the timings from the DDR2 667 profile. Therfore, the SPD has to be edited in advance to force the BIOS to use higher timings and a lower FSB-to-RAM frequency-divider.
For flashing, there are edited profiles for 2 GB sticks and 4 GB sticks with 16 chips available
here. Use the instructions in
this post to flash them to your RAM. DDR2-533-profile is strongly recommended for boards with the Intel X3100 GPU, because the FSB-to-DRAM divider also affects the IGP clock. With FSB 1066 and the DDR2 667 profile, the IGP is overclocked by 166 MHz (render clock) and 110 MHz (display clock) which can sometimes lead to artifacts on the screen when running windows aero theme or graphics intensive stuff. With FSB 1066 and the DDR2 533 profile, the IGP is overclocked only by 33 MHz (render clock) and 92 MHz (display clock) which should never be a problem.
The DDR2 667 profiles will force the BIOS to run the RAM at 440 MHz and CL6 timings. This might work stable for DDR2 800 RAMs. The DDR2 533 profiles forces the BIOS to run the RAM at 354 MHz and CL6 timings, which should almost always work stable for DDR2 800 and DDR2 667 memory sticks.
b) Create a bootable USB pen drive that boots to bare DOS.
Download the modified xiaofei290-BIOS from here or here, extract the archive and copy the "7luj26us"-folder on the USB pen drive. Be aware that the modded BIOS does not contain the microcodes for all the CPUs that were originally used in T61, so you should already have your new FSB-1066-CPU, because the old CPU will most likely not work anymore after the BIOS flash.
Edit: With the initial mod BIOS from xiaofei290 @ 51nb.com, Merom CPUs did not work any more in the T61 (only FSB 800 and FSB 1066 Penryn CPUs + T7100) because it lacked their microcodes. There are better mod-BIOS-files available now from highsun @ 51nb.com that do not have this limitation and have further advantages. They are also mentioned in
4). With those BIOS files, all socket-P-CPUs should work. It also enables the use of some FSB 800 CPUs (e. g. T6600) that did not work with the original Lenovo BIOS, without any hardware modification.
Some of them can also undervolt the nvidia GPU and activate PCI express power mangement functions (ASPM). All versions are available with a modified quadcore APIC table (for use with quad cores) and without it (for use with dual cores).
Download one of the BIOS files (which are linked
here in the first table) acording to your needs regarding quadcore APIC, nvidia GPU voltage and ASPM and the
DOS flasher program.
Extract the flasher and the downloaded BIOS file. Create a new folder with the name "DIR" and put in the extracted files (besides "liesmich.txt"). Rename the extracted BIOS file to "BIOS.ROM". The folder should now contain three files:
[/size]
Copy this folder to the bootable USB pen drive you created. Boot from the USB pen drive into DOS, cd to the
"7luj26us"-folder DIR folder
[/size]
with the "BIOS.ROM" file and the flasher in it. Then type:
Code: Select all
phlash16.exe BIOS.ROM /S /X /C /MODE=3 /BO=BACK.ROM
[/size]
which will backup your current BIOS to BACK.ROM and then flash the modded BIOS.ROM. I did not try it, but you should be able to revert to the old BIOS with
Code: Select all
phlash16.exe BACK.ROM /S /X /C /MODE=3
[/size]
Alternatively, you can just type
[/size]
to immediately start flashing the mod BIOS without backing up the old BIOS.
The flash tool told me something about a wrong checksum before flashing, but I proceeded anyway and it worked, so this seems to be related to the modifications done to the BIOS.
Power off after the flash and...
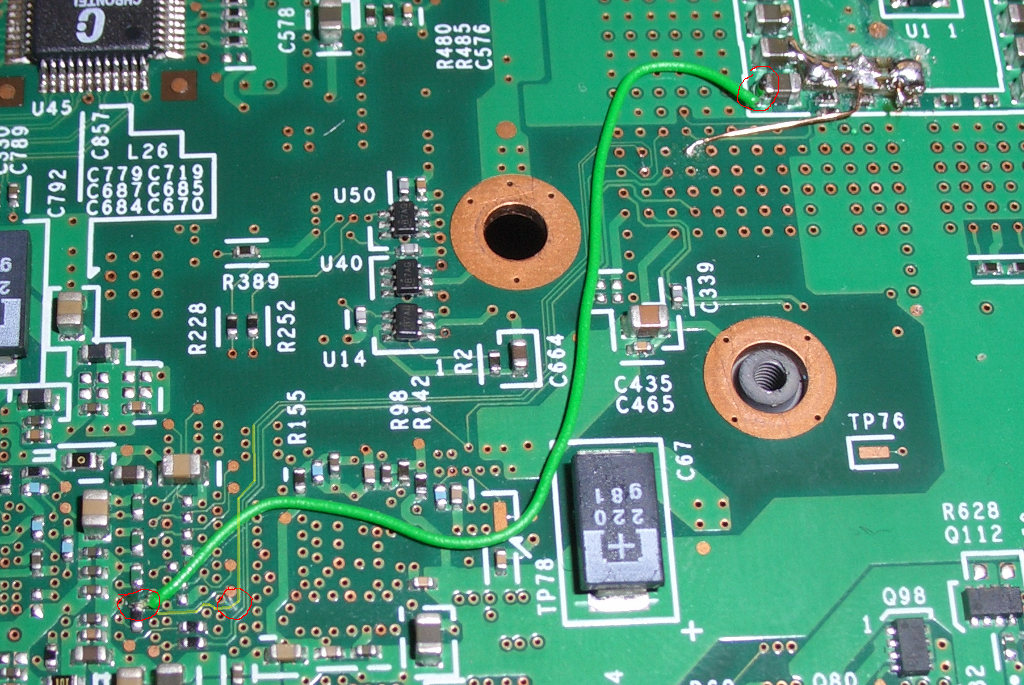
2) Modify the mainboard:
http://abload.de/img/266-fsbe2cow.jpg (240 kB image hoster link)
Cut the yellow marked trace, then connect the marked side of the resistor with the marked side of the capacitor. This ensures that the chipset will always think that it operates at 200 MHz, which is needed. There is no need to revert this changes if you want to use a CPU made for FSB-800 when doing the modification this way (but the BIOS has to contain the microcode for the CPU).
Now you should be able to use FSB-1066-CPUs. If you have the hardware, you should test stability now with a normal FSB-1066-Core2, so that you can be sure that your RAM and chipset work stable at the higher speeds before proceeding with the next steps required for quad core support.
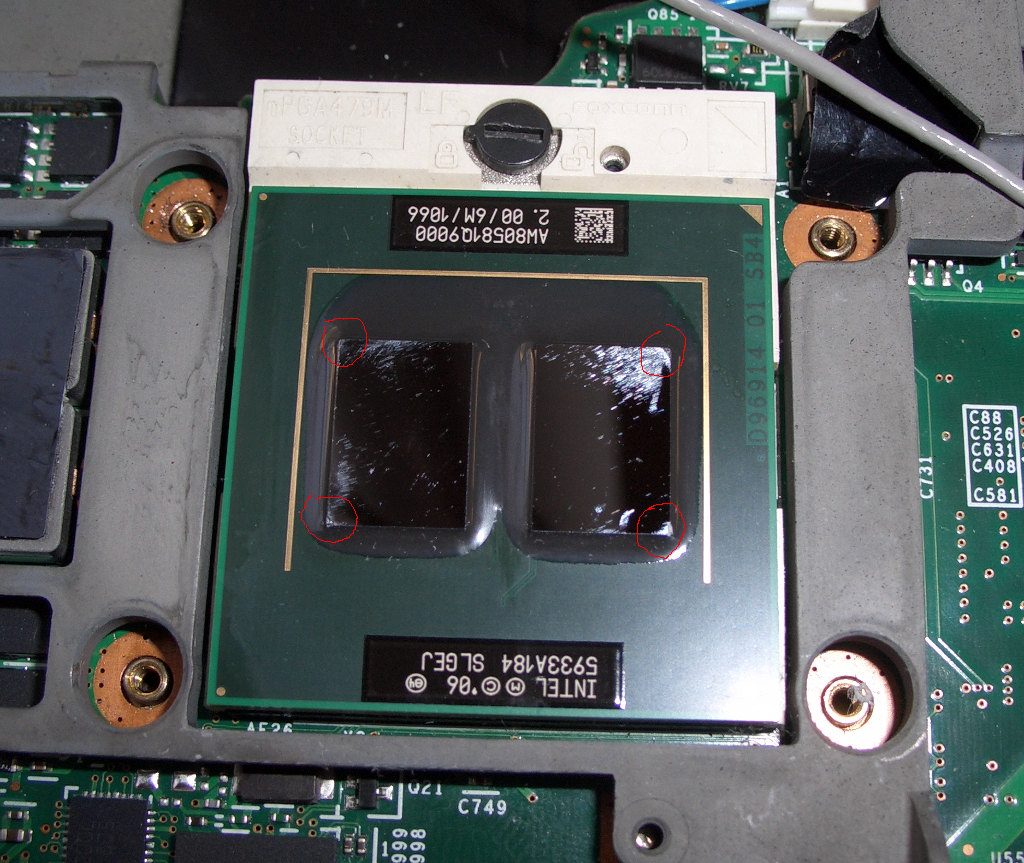
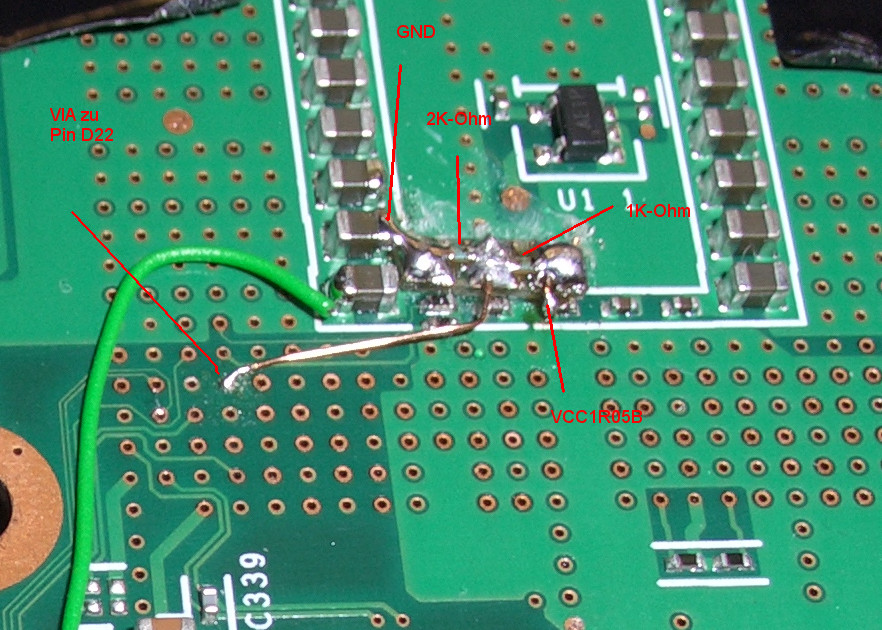
3) (only for Core2 Quad) Modify the mainboard further and insulate CPU pins:
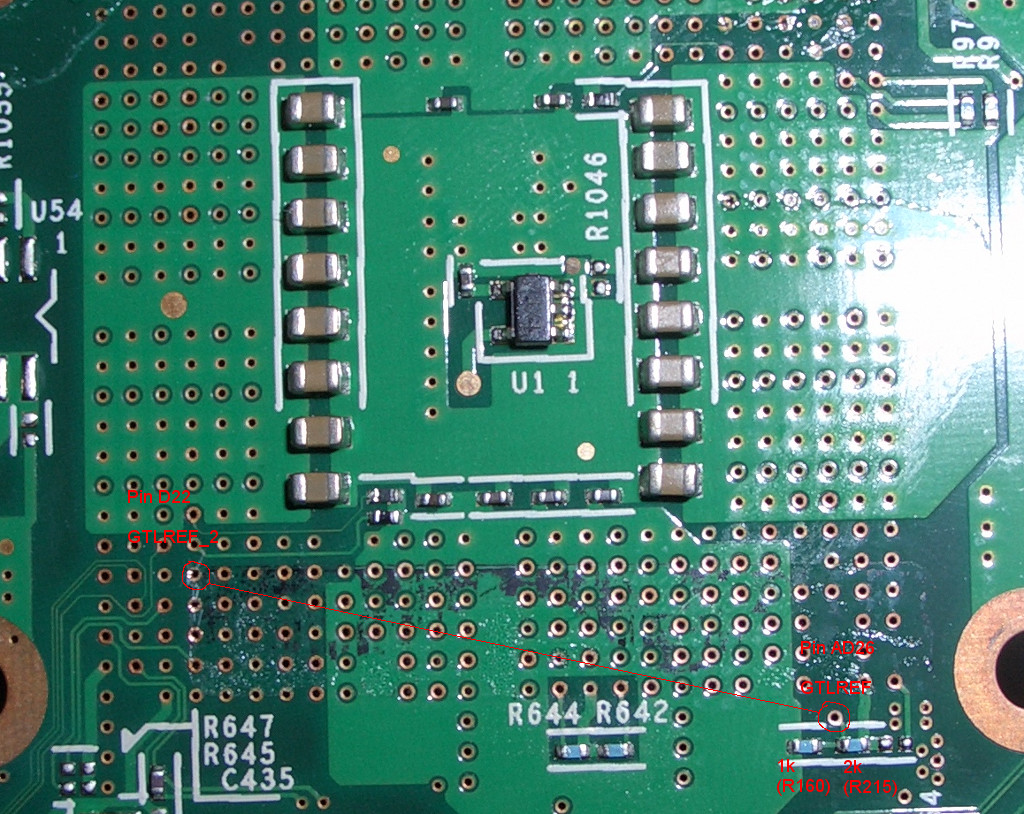
Core2 Quad needs GTLREF (which is 0.63*VCC1R05B) at pin D22, which is reserved on dual cores. We can access the socket contact for this pin at the via shown in this picture:
http://abload.de/img/t61-mainboard-quadcor4qep0.jpg (210 kB image hoster link)
Connect a 2k resistor to this via and GND and another resistor with value of 1k to this via and VCC1R05B. This is how Lenovo does it in the W700.
Edit: Here is a much simpler solution suggested by FryPpy, which is confirmed to work.
To boot up with a quad, this is not even needed (only pin isolation), but i did not test if this is also the case when all four cores are activated (i do not think so).
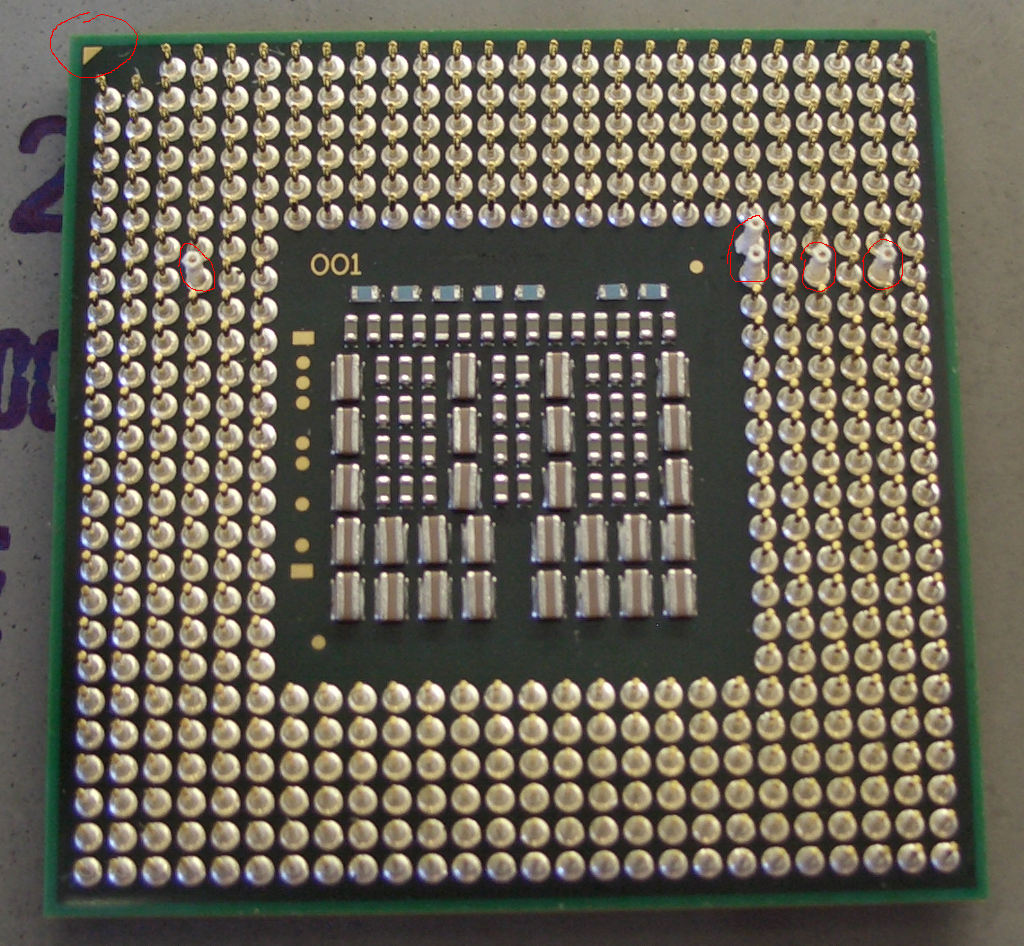
Besides this, a core 2 quad has some more signals that seem to be used for testing when designing motherboards for this CPU and are not needed for normal operation. But some of the pins with these signals on a quad are connected to VCC or VSS on dual cores, so we have to insulate them on our quad core when inserting it in a mainboard made only for dual cores.
These are D8, AA7, AA8, AC8 and AE8.
I used the insulation of thin wires, cutted it into pices, so that I got small tubes which I could stick onto the pins with some tweezers.
http://abload.de/img/quadcore-pinsy1dm5.jpg (240 kB image hoster link)
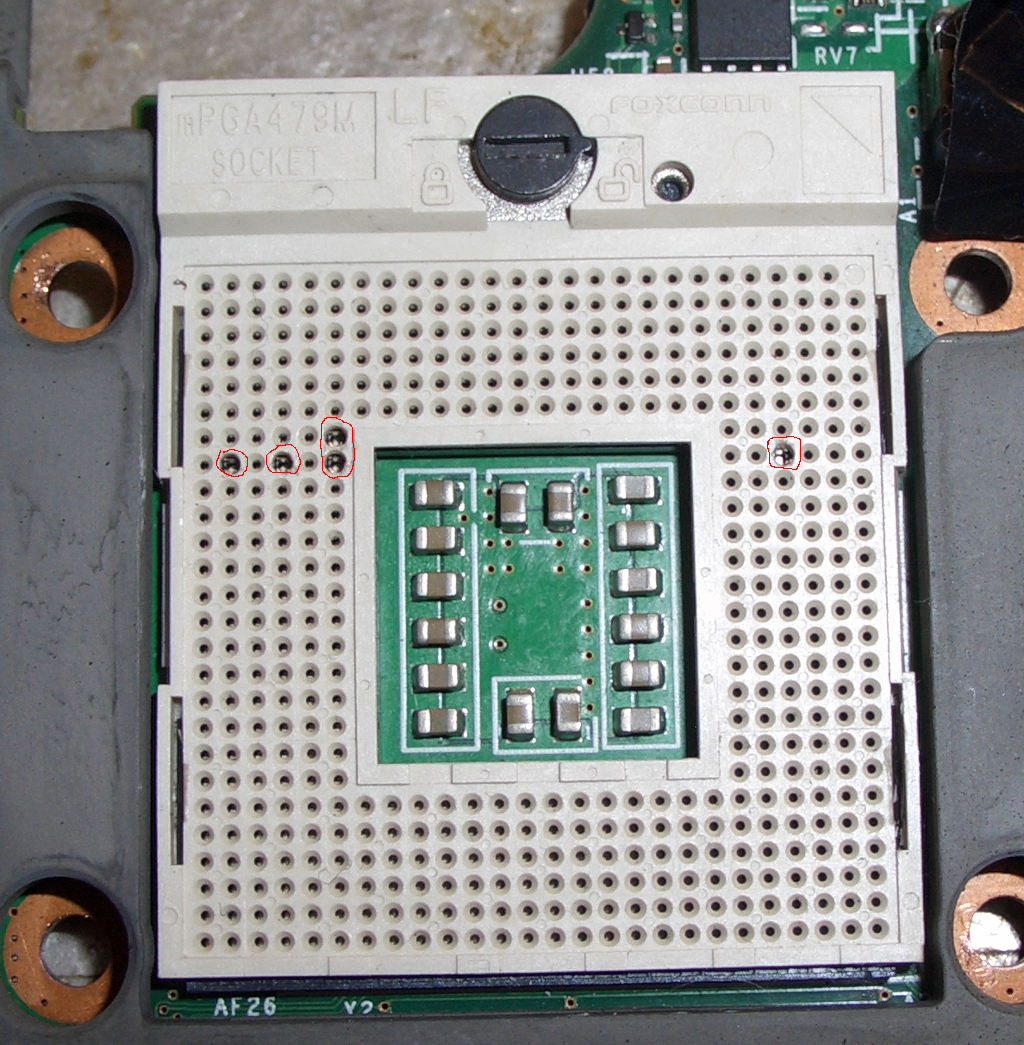
Now the corresponding holes in the socket have to be drilled up. I opened the four clips at the side of the socket that hold down the top with the holes in it and placed a thin sheet of wood between the two parts of the socket, so that no chips will get into the socket. Do NOT try to drill the holes up without hanging out the top of the socket!
http://abload.de/img/bild3mns98.jpg (150 kB image hoster link)
(this image shows T500 board, but it is done the same way on T61 board)
Put the socket together again:
http://abload.de/img/sockelt6126e71.jpg (225 kB image hoster link)
For instructions how to hang out the top, see
this post (contains also images). Do NOT drill the holes without hanging out the top, this will damage the socket contacts!
Another possibility is to cut off the mentioned pins from the CPU.
You should now be able to insert the quad core with the insulation tubes on the pins (or with the pins cut off) into the socket and lock it. After installing the cooler, booting with the quad core should work.
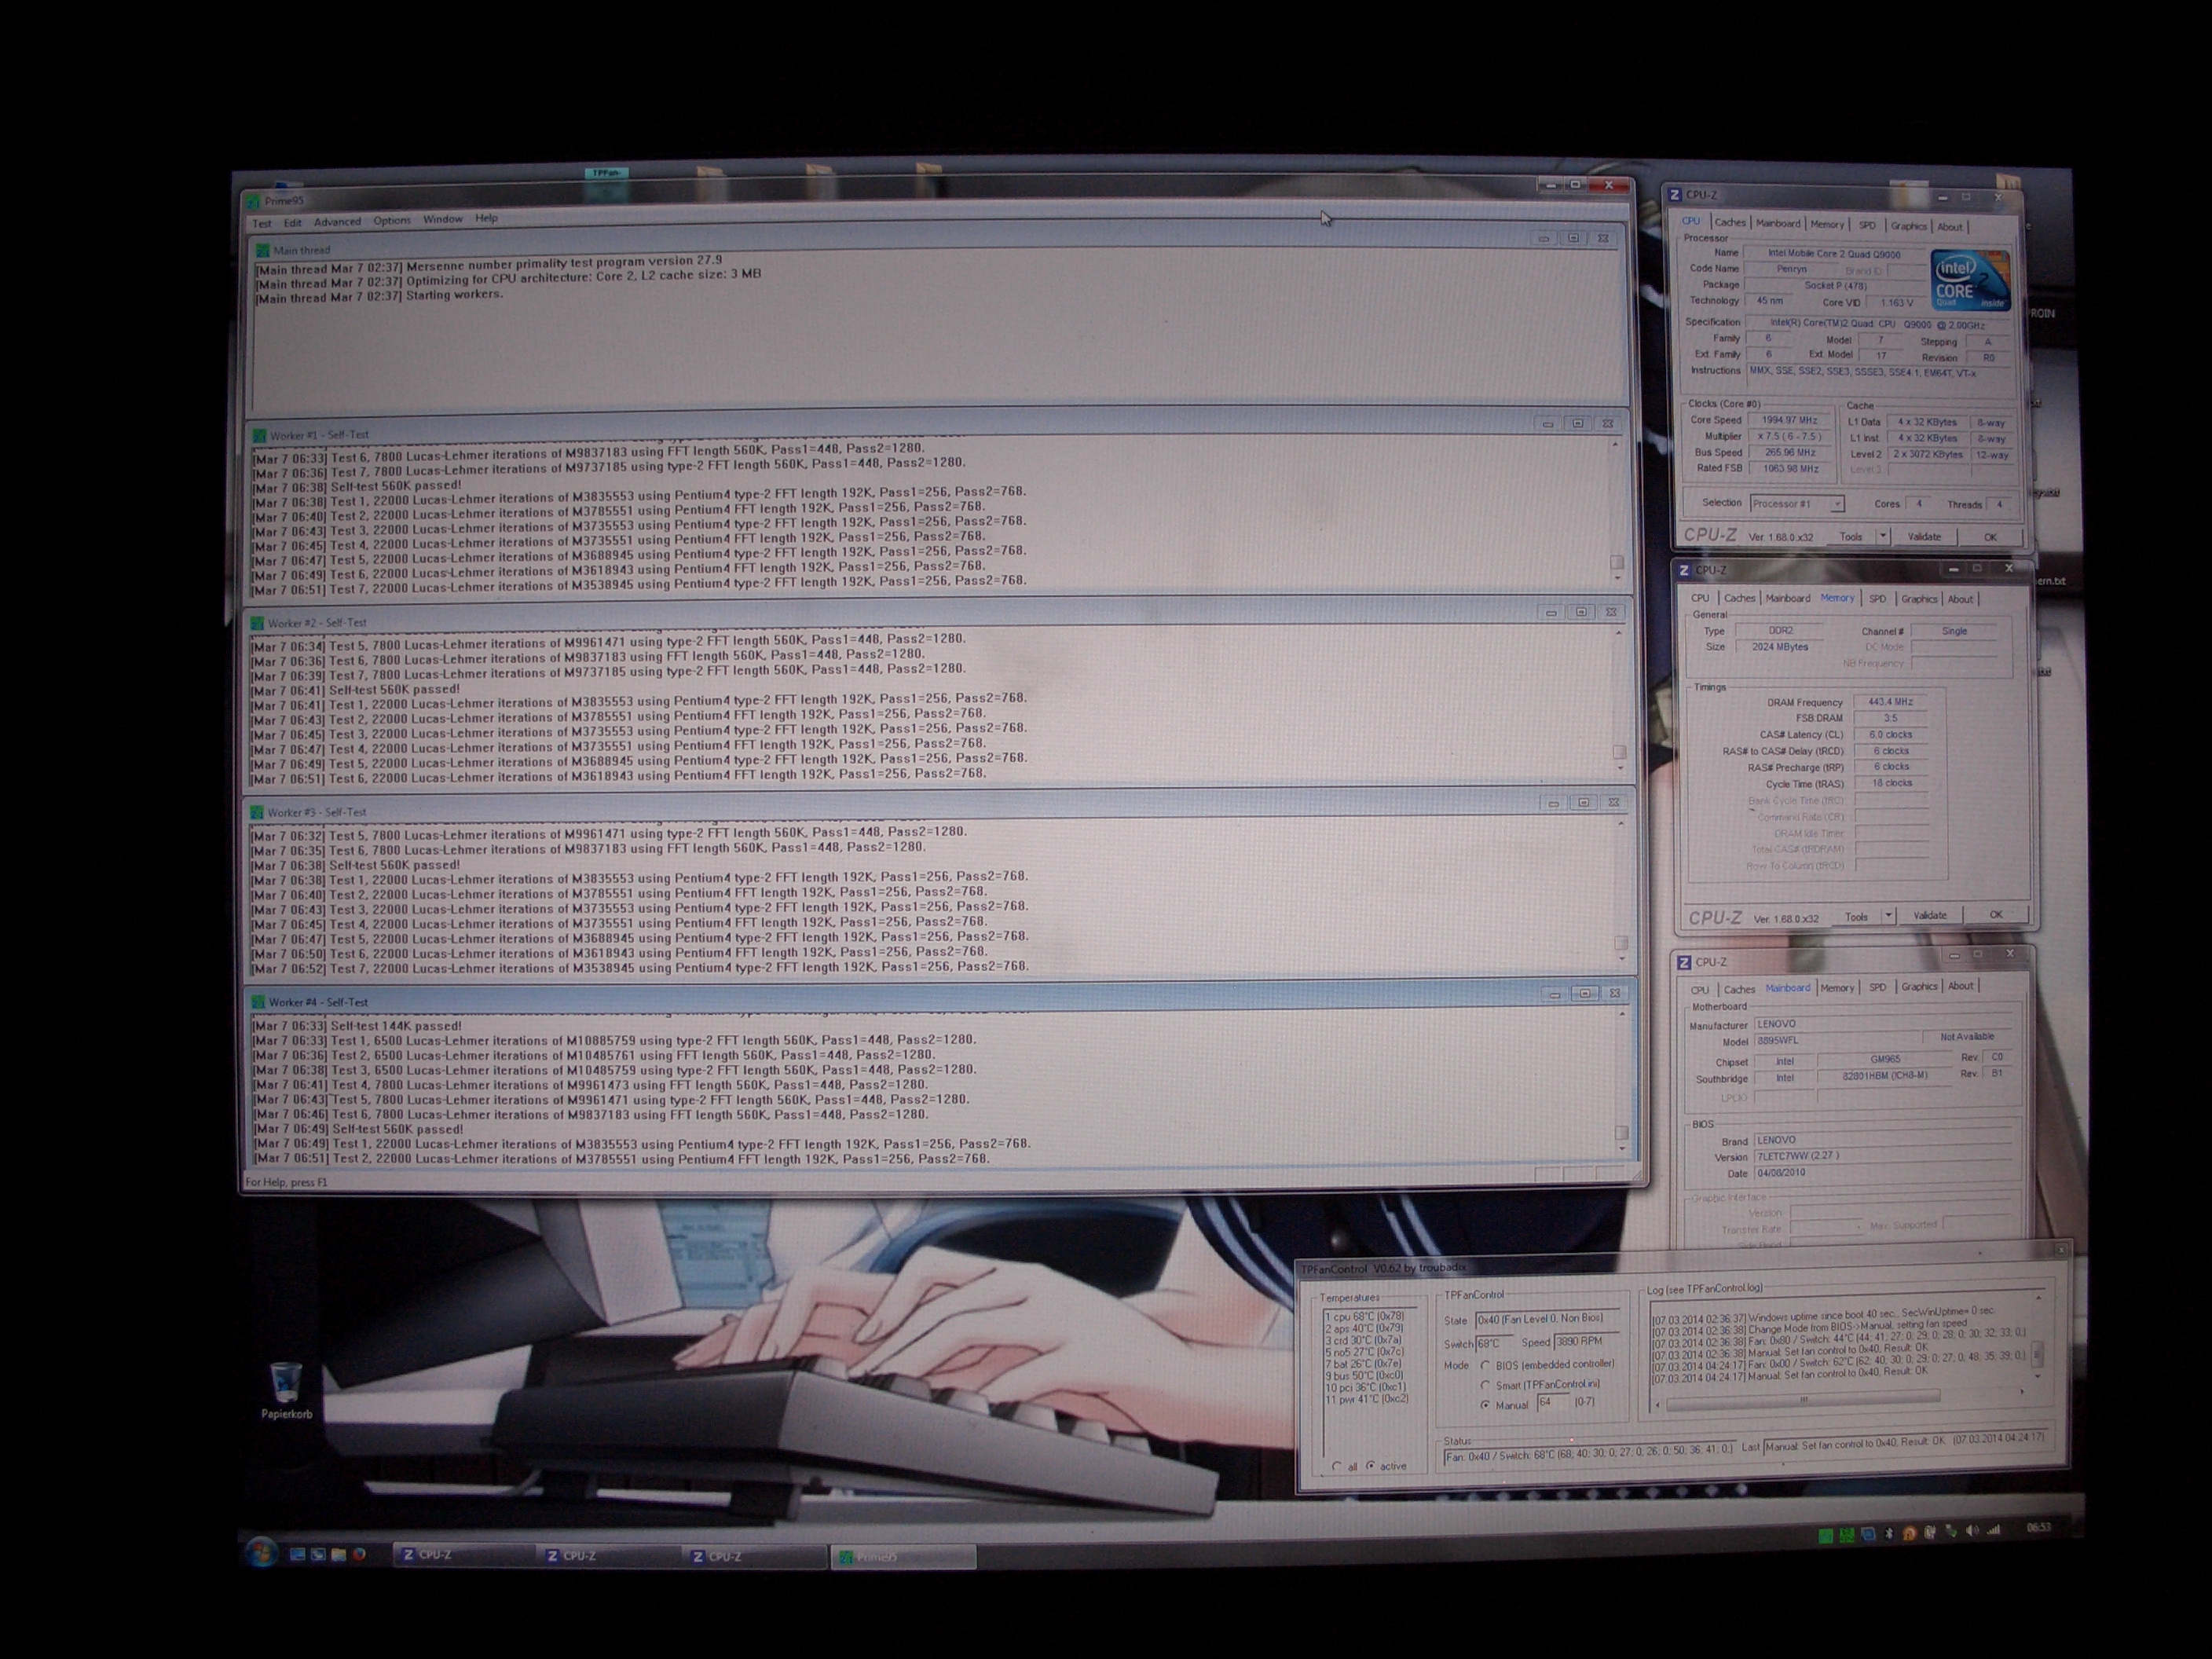
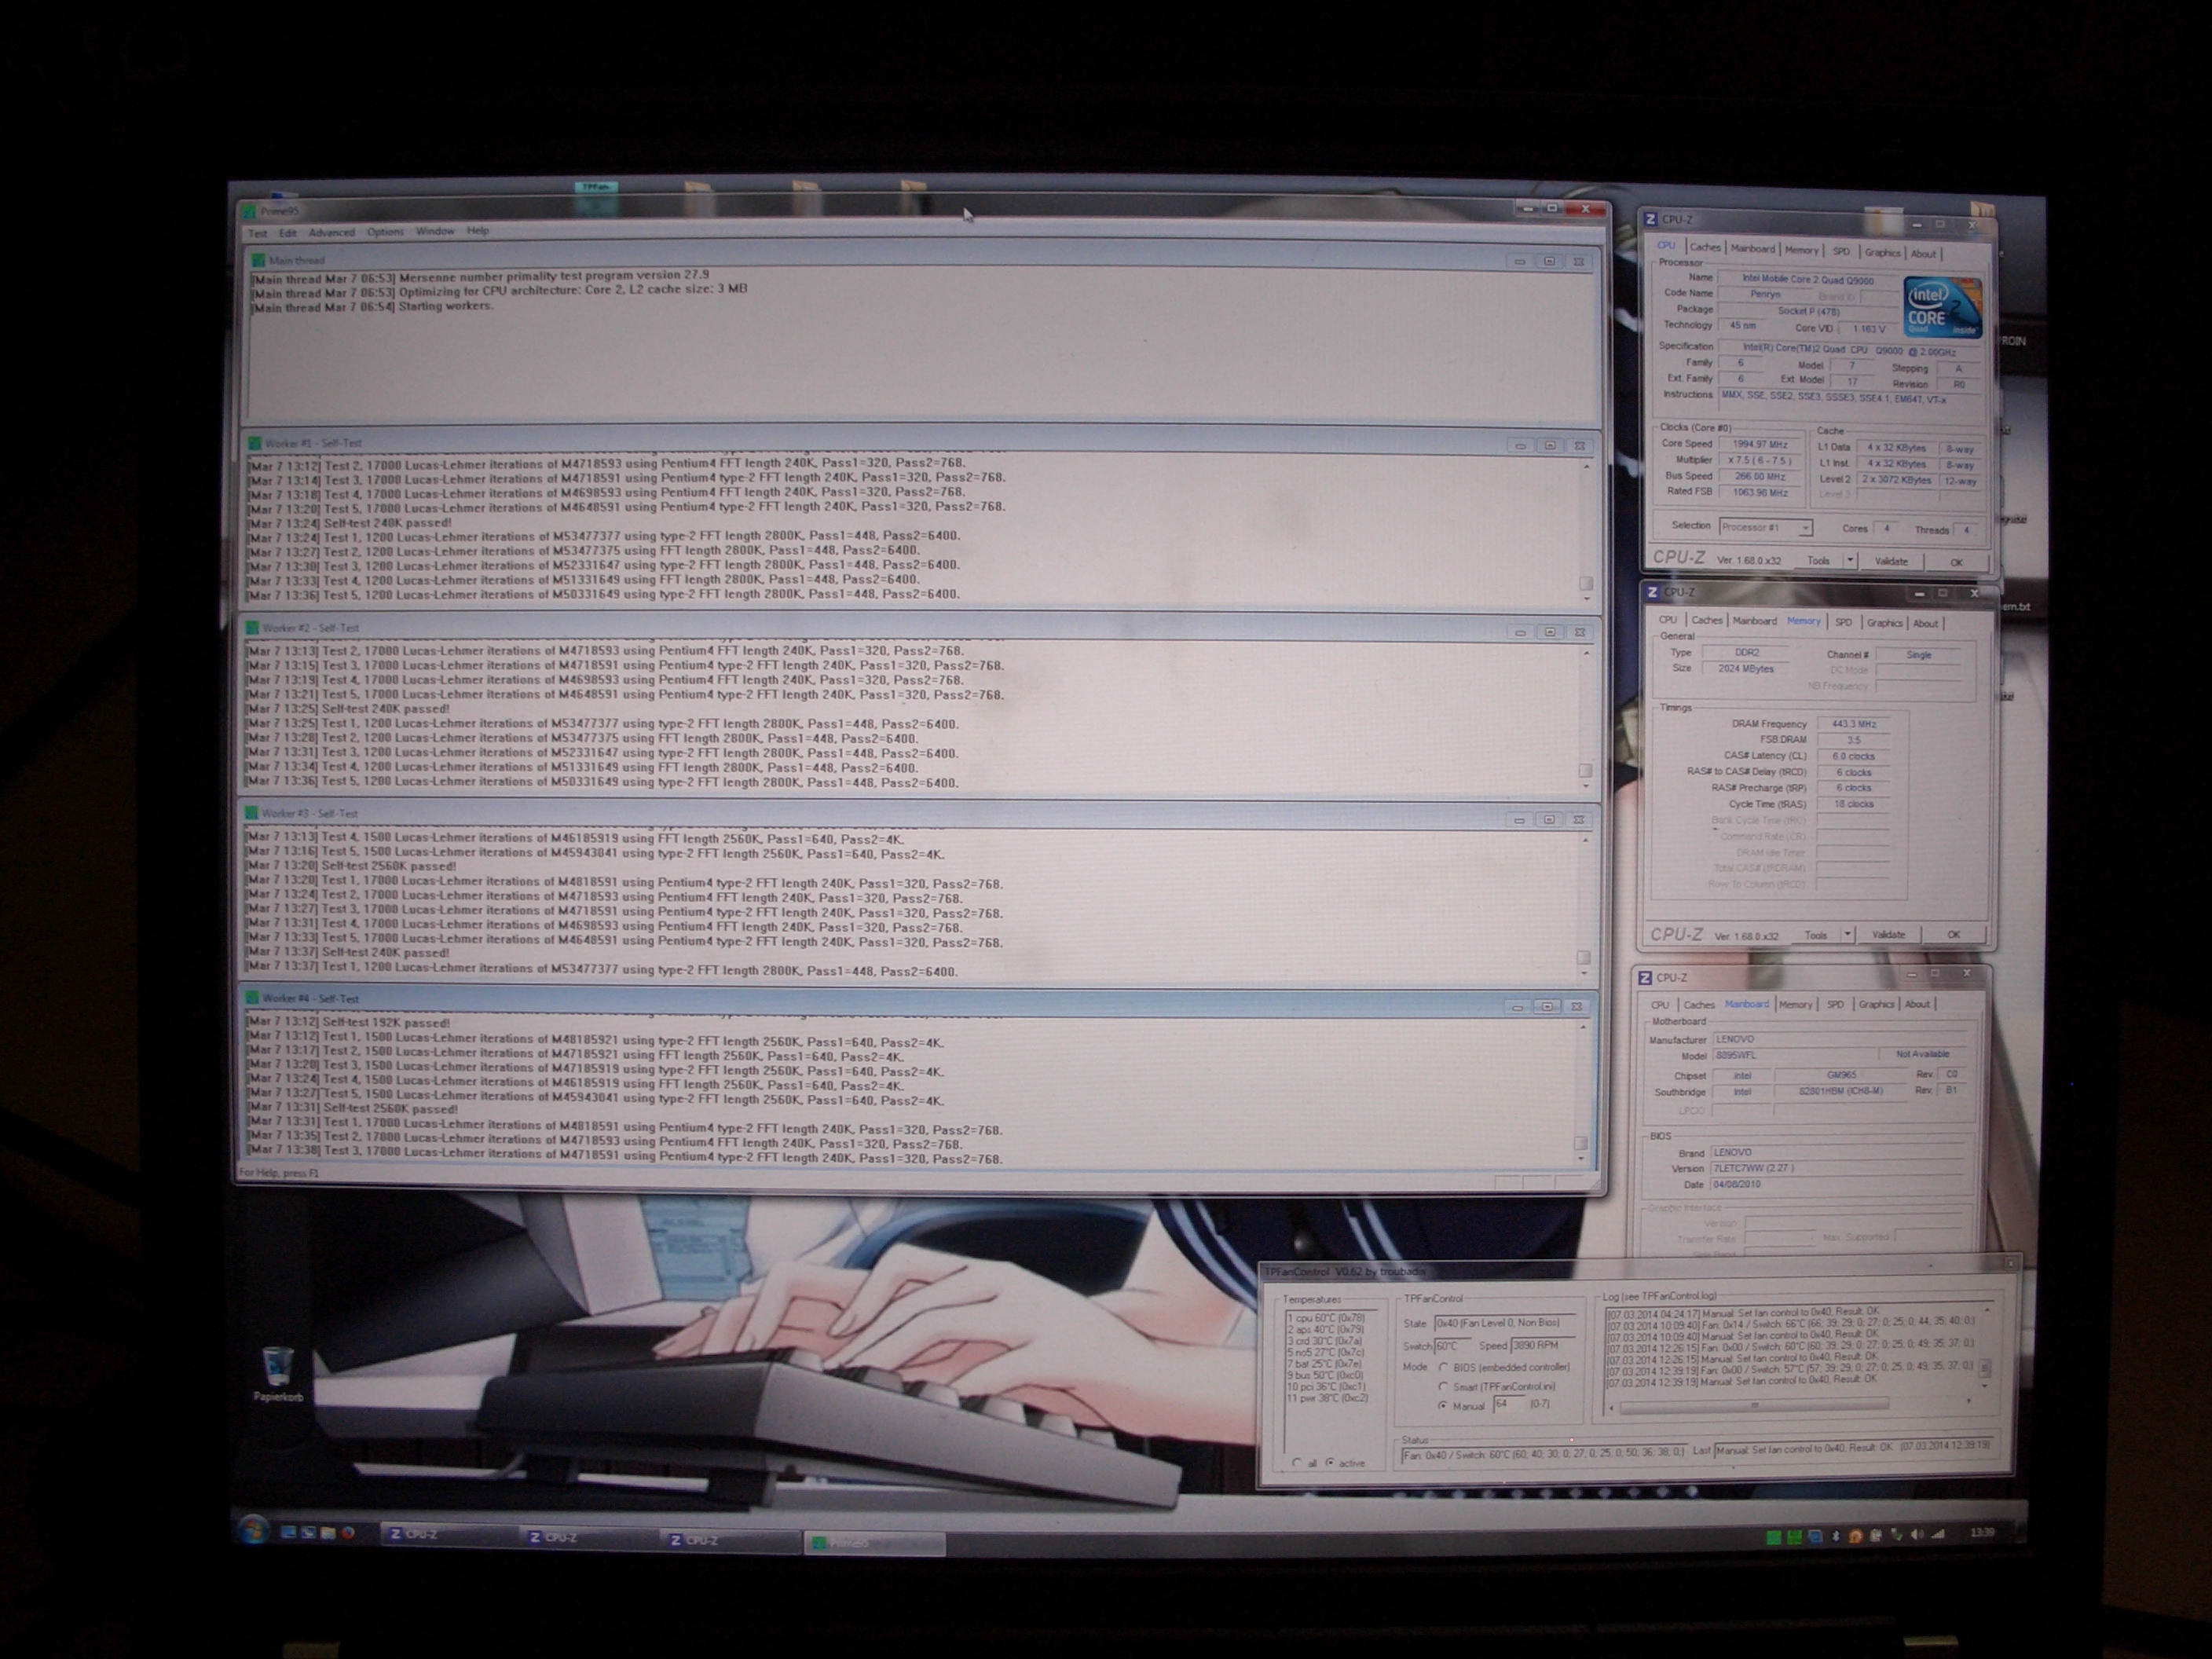
4) (only for Core 2 Quad) Activate all four cores:
Edit: With the original mod-BIOS from xiafei290 @ 51nb.com, it was needed to load a modified APIC table with the acpi command from the GRUB2 bootloader, because otherwise core 2 and 3 would not be activated (only core 0 and 1).
Meanwhile there are new mod-BIOS-files available @ 51nb.com that contain this modified APIC table, so the grub2-stuff is no longer needed to activate the two additional cores. Flashing the modified BIOS-files with the quadcore APIC table is sufficient. Credit to highsun @ 51nb.com who made these mod-BIOS-files.
They are linked here:
http://www.thinkpad-forum.de/threads/172581
Some of them can also undervolt the nvidia gpu and activate PCI express power mangement functions (ASPM). All of them are also available without the quad core APIC table (for use with dual cores).
There will be an error message about wrong checksum while flashing them. This is normal. Ignore it and proceed with the flash.
Old quadcore activation method with the use of the original mod-BIOS from xiaofei290 left here for reference, but now obsolete:
old quadcore activation Method left for reference wrote:The BIOS does contain the microcode for the quad cores, but to the operating system it will only notify two CPU cores. To make the operating system aware of the two additional CPUs, one needs to load a modified APIC table with the "acpi" command of the grub2 bootloader. This way, every operating system that will be booted by GRUB2 should be able to recognize all four CPUs (tested: linux and windows 7).
I will not go into the details here, if you want to know more, have a look at this thread:
http://thinkpad-forum.de/threads/172581 ... en-bringen
Just download and extract this zip file:
download
It contains the modified APIC table that we need to load with GRUB2. I assume that you have installed a working linux with GRUB2 and maybe also Windows 7, which you boot via GRUB2.
I use opensuse 13.1, for other linux distributions, it might be necessary to use other paths and commands.
Copy the skript "01-apic" from the zip file to "/etc/grub.d" and make it executable. For other linux distributions, it migth be necessary to change the path to "grub-mkconfig_lib" in the skript.
In the directory "/boot" create a directory "ACPI" and place the file "APIC.aml" in it. Then generate an new GRUB2-config by executing (as root)
Code: Select all
/usr/sbin/grub2-mkconfig --output=/boot/grub2/grub.cfg
[/size]
that will load the APIC table. You should see some output like "found custom APIC table" when creating the new config.
After a reboot, all four cores should be active.
EDIT:
5) (only for Core2 Quad) enable speedstep and maximum clock on cores 3 and 4
Because the modified BIOS does not activate speedstep and expose the different power/clock-states to the OS (e. g. in windows device manager, there are only two CPU cores instead of 4), this has to be enabled manually via 3rd party software. Otherwise, the cores 3 and 4 always operate at the lowest frequency. Credit to RMSMajestic for discovering this and for the method to circumvent the problem in windows.
For windows you can use the software
throttlestop for this.
For linux, see the instructions posted
here (contains also images)
Why it does not work on T500 and W500:
This information is based on tests with a T500 and an R500 mainboard. But since T500 and W500 use the same mainboard (and the same BIOS), I think that this information is also valid for W500 (and probably also T400 and R400, but this is not verified)
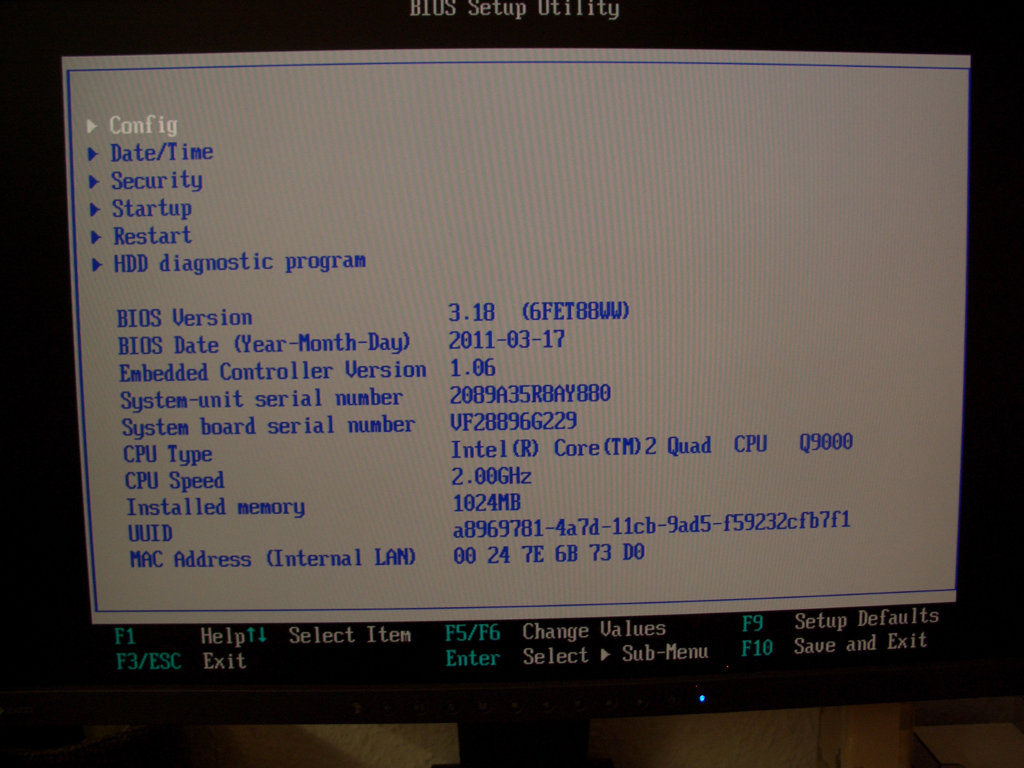
Generally, you can also get into the BIOS with a quad core installed in a T500. Only pin insulation is required (and if it would be able to activate all four cores, GTLREF modification would most likely also be needed). The BIOS seems to already contain the microcodes (at least the one for Q9000), since the processor was recognized as Q9000 in the BIOS.
http://abload.de/img/bild8yss96.jpg (135 kB image hoster link)
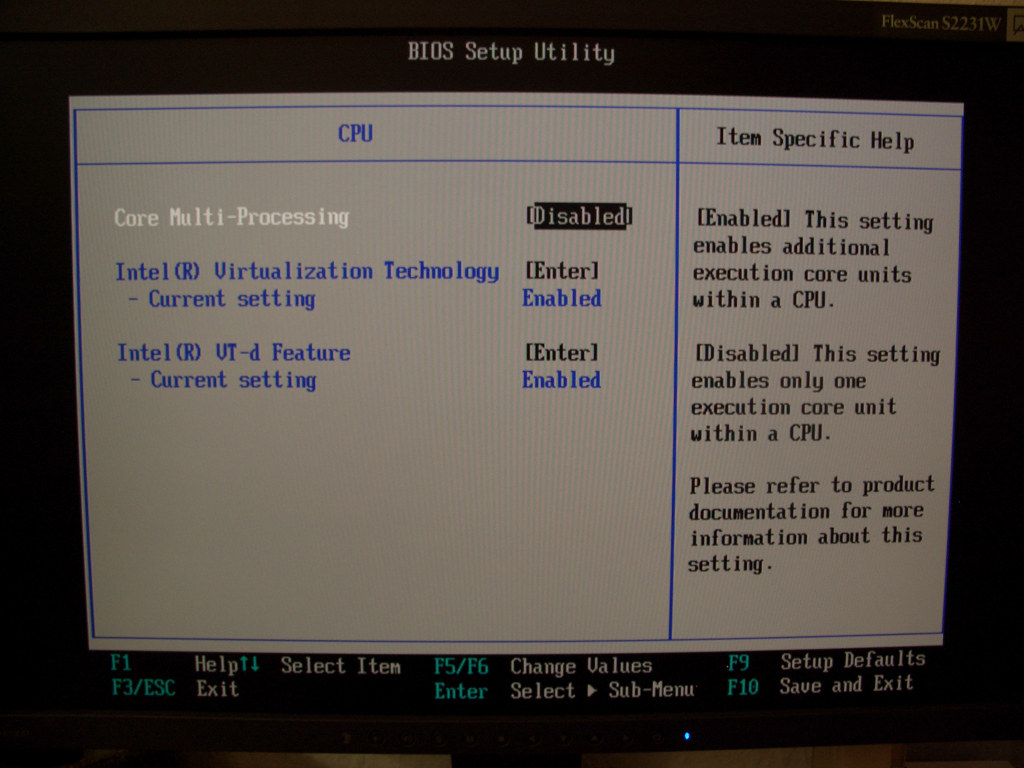
But to be able to boot an operation system, you will have to disable "core multi processing" in the BIOS because otherwise, the BIOS will hang while trying to continue the boot process to a bootloader like GRUB2.
http://abload.de/img/bild95hstz.jpg (145 kB image hoster link)
But with this option disabled, only one core is usable.
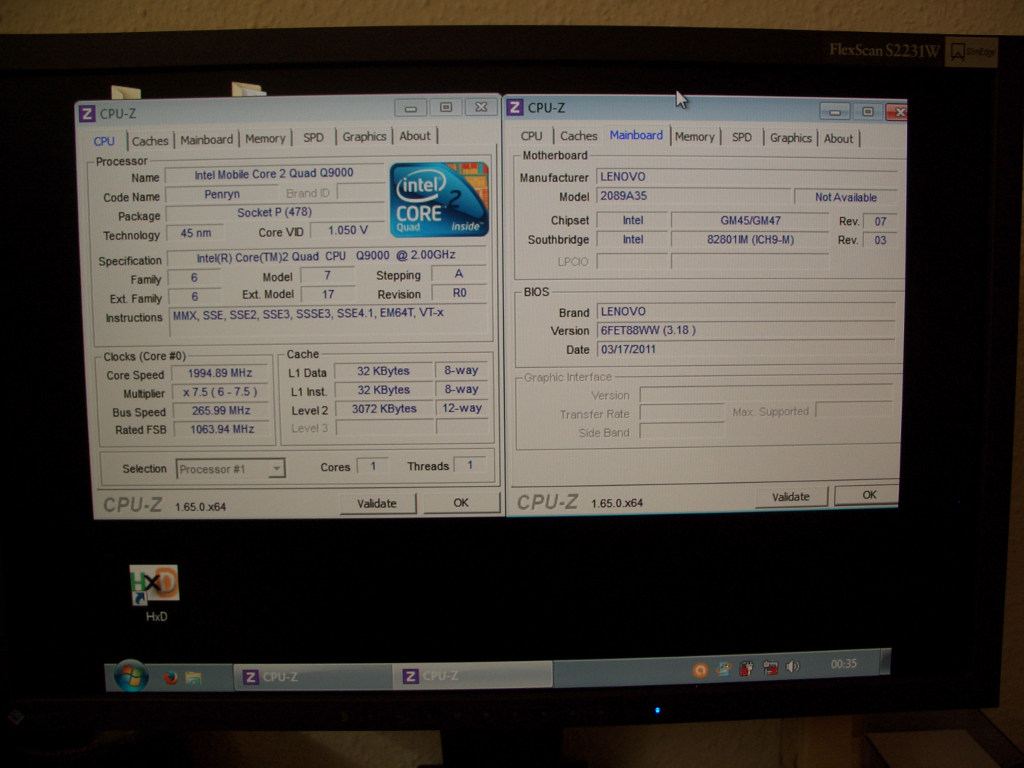
http://abload.de/img/bild7h7sy9.jpg (140 kB image hoster link)
Trying to load the modified APIC table with GRUB2 will fail with a system freeze (this also happens with a supported dual core installed and "core multi processing" set to "enabled" when trying to load any ACPI table). In the GRUB2 documentation, it says that the "acpi" command that loads modified tables does not work with some BIOSes, which seems to be the case here. When using the command with the option "-e", table loading works but this will make only GRUB2 itself use the modified table. Operating systems that are booted with GRUB2 will not be able to see it with this option, rendering the command useless.
To make things worse, the probability is high that even if the table loading could be done (without the "-e" option), it would still not work because in advance of all this I did a test on an x61t where I set "core multi processing" to "disabled" and then tried to re-activate the second core of the Core2 L7500 via APIC table loading, which was unsuccessful (table was loaded, linux kernel tried to activate the second core but said "CPU1 not responding" and continued to boot with CPU0 active only). So it seems to be that "core multi processing" has to be enabled if activating additional cores via APIC table should work. But on T500, this setting has to be disabled to be able to boot any operating system at all with the quad core installed.
So I think that for T500, W500 (and probably also T400 and R400) a modified BIOS with full quad core support is needed. The R500 mainboard even lacks the via needed to access the socket contact for pin D22.


